EN
EN
How to Cut Polycarbonate Sheet
Cutting polycarbonate sheet is more demanding than it appears. In actual field conditions, roughly 80% of edge cracking, stress whitening, and seal failures can be traced back to the cutting process itself. Choosing the right tool, setting correct parameters, and finishing properly are the three fundamentals that determine PC sheet installation quality.
This article addresses the most common applications — greenhouse construction, skylight installation, and industrial roof cladding — and systematically introduces four methods for cutting polycarbonate sheets, along with ready-to-use parameter tables and checklists.
1. Four Main Methods for Cutting Polycarbonate Sheet
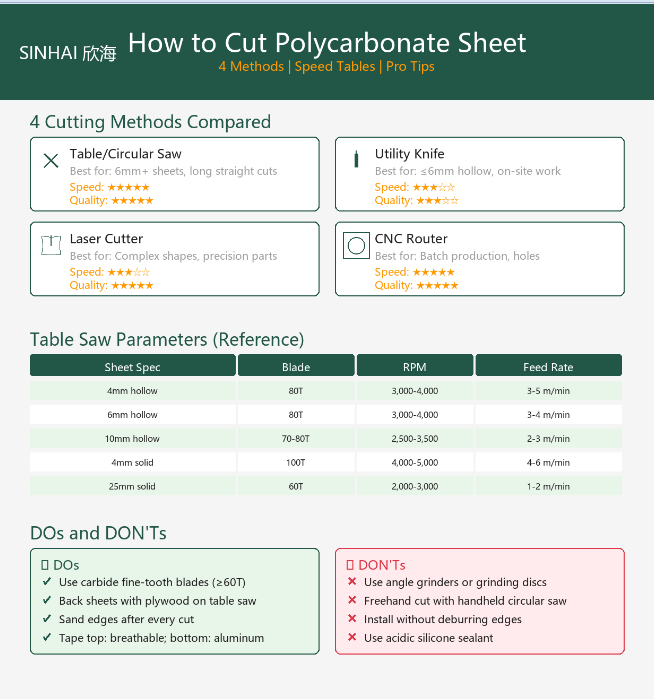
The four most widely used cutting methods are: table/circular saw cutting, utility knife scoring, laser cutting, and CNC routing. Each has its optimal use case, and contractors should match the method to sheet thickness, cut precision requirements, and available equipment.
Table/circular saw cutting delivers the best balance of cut quality and efficiency. Paired with a carbide fine-tooth blade (80+ teeth), it produces clean, straight edges and handles sheets 6mm and above — hollow and solid alike. It is the preferred method for professional contractors.
Utility knife scoring suits sheets 4–6mm hollow or ≤3mm solid, especially for small batches or on-site work without power access. Cut quality depends heavily on blade sharpness and consistent scoring technique.
Laser cutting is ideal for complex shapes, precision parts, and small-batch custom production. Edges are clean with minimal heat-affected zone, but requires specialized equipment and ventilation — unsuitable for field work.
CNC routing handles batch custom shapes, holes, and curved surfaces with the highest precision and repeatability. Higher equipment investment limits it to factory or workshop settings.
For most greenhouse and skylight projects, the recommended approach is a combination: table saw for primary sizing, utility knife for finishing touches, and a hand drill for mounting holes. This covers both efficiency and precision with a low equipment barrier.
2. Table Saw Cutting: Parameters and Operating Standards
The table saw is the most common PC sheet cutting tool, but the same saw can produce dramatically different results depending on how it is set up. Three core variables determine outcomes: blade tooth count, spindle speed, and feed rate.
The following table lists parameters validated by the Xinhai Technical Center, applicable to carbide fine-tooth blades (80+ teeth):
Table 1: Recommended Table Saw Parameters for Cutting PC Sheet
Key operating rules:
Place a sheet of plywood under the PC sheet during sawing to reduce vibration that can chip the cut edge. The blade must be kept sharp — a dull blade generates friction heat that creates micro-cracks at the cut line. These cracks are invisible to the eye but propagate under installation load, eventually causing failure.
When cutting hollow sheets, feed the blade into the UV-coated side first to minimize coating chipping along the cut edge. Solid sheets have no directional requirement, but operators should monitor blade temperature and reduce feed speed if heat buildup occurs.
Two critical mistakes must be avoided: Using an angle grinder with a cutting disc — friction heat melts the edge, causing yellowing and residual stress — and using general woodworking blades (24–40 teeth), which cause severe chip-out and ragged edges, sometimes shattering the sheet edge entirely.
3. Utility Knife Scoring: On-Site Solution for Thin Sheets
When power is unavailable or batch sizes are small, scoring with a utility knife is a viable and efficient alternative. This method is only suitable for hollow sheets ≤6mm or solid sheets ≤3mm. Thicker sheets cannot be cleanly broken by hand scoring alone.
Standard five-step procedure:
Step 1 — Mark the cut line. Use a metal straightedge as a guide and mark the line with a water-soluble pen. Never use oil-based markers — the solvents in oil-based ink attack and etch the polycarbonate surface.
Step 2 — Score the first pass. Draw the knife along the straightedge 1–2 times, cutting approximately one-third of the sheet thickness. The key is using the exact same path on every pass; any deviation causes the break line to wander.
Step 3 — Flip and score the reverse side. Turn the sheet over and score the same location 1–2 times at equivalent depth. This creates a continuous stress concentration line through the full sheet thickness, ensuring an even fracture point.
Step 4 — Snap the sheet. Align the scored line with the table edge and apply firm, steady downward pressure with both hands. A decisive, single motion produces a clean break. Hesitation or uneven force creates jagged fractures.
Step 5 — Deburr the edge. Sand the cut edge smooth with 240-grit or finer sandpaper, stroke in one direction along the cut line.
4. Edge Treatment After Cutting: Proper Procedure and Sealing Methods
Cutting completes only half the process. Edge finishing directly determines waterproofing performance and long-term UV resistance.
Sanding is the first step. Use 240-grit sandpaper for initial smoothing, then finish with 400-grit. Always sand in one direction along the cut — never scrub back and forth, which creates new scratches. This step takes approximately two minutes per sheet but effectively removes micro-crack initiation points.
Cleaning follows immediately. Wipe the surface with isopropyl alcohol (IPA) or a clean lint-free cloth dampened with water. Acetone, toluene, and gasoline solvents are strictly prohibited — all of these chemically soften and degrade polycarbonate.
Taping the ends is the most critical step and the most frequently mishandled. Hollow sheet interiors are empty, and if improperly sealed, dust and moisture enter the cavities, reducing light transmission and causing internal fogging. The correct approach distinguishes between the top and bottom open ends: the top end (toward the ridge) gets breathable tape, which allows internal moisture to escape while blocking dust; the bottom end (toward the eave) gets solid aluminum foil tape for complete waterproof sealing.
Two common errors require particular attention: Taping both ends with solid sealing tape — this traps internal moisture, which condenses into water accumulation under temperature cycling — and using acidic silicone sealant (acetoxy cure), whose acetic acid component corrodes polycarbonate and causes brittle cracking at the seal point. Always use neutral-cure silicone sealant.
5. Preventing Post-Cut Cracking: Three Causes and Four Countermeasures
Cracking after cutting is the most frequent PC sheet installation complaint. Analysis of over 200 cracking cases by the Xinhai Technical Center over three years pinpoints three primary causes.
Residual cutting stress is the leading cause, accounting for approximately 45% of cases. Dull blades, overly slow feed rates, and repeated re-cutting all accumulate thermal stress at the cut edge, forming micro-cracks. Using a sharp blade and maintaining recommended feed speed are fundamental to eliminating this risk.
Insufficient thermal expansion allowance ranks second, at approximately 30%. Polycarbonate expands roughly seven times more than steel per degree of temperature change. Without adequate expansion gaps, summer heat causes the sheet to elongate and compress against its frame, cracking from the edges inward. The rule of thumb: allow 3–5mm of expansion space per linear meter of sheet.
Over-tightened screws account for approximately 15% of cases. Many installers tighten fasteners as firmly as possible, but PC sheets need room to move. Screw holes must be pre-drilled 2–3mm larger than the fastener shank diameter, allowing the sheet to flex thermally without being restrained by the hardware.
Based on these three root causes, the following four countermeasures are recommended: sand edges with 400-grit immediately after cutting; apply neutral-cure silicone sealant at sheet-frame contact points to cushion stress; apply a thin anti-rust coating around screw holes as a stress buffer; and inspect the sheet surface for pre-cracks before installation — replace any damaged sheets before proceeding.
6. Laser Cutting and CNC Routing: Parameters for Precision Machining
For applications demanding precision, laser cutting and CNC routing offer professional-grade solutions.
Laser cutting is best suited for solid sheets 2–6mm or hollow sheets 6mm. A CO₂ laser at 130–300W is the standard choice. For solid sheets, 150W at 25–35mm/s speed delivers optimal results. For hollow sheets, reduce power to 150W and speed to 20–30mm/s to prevent internal ribs from melting and fusing. Laser cutting generates phenol-compound fumes requiring adequate workplace ventilation.
CNC routing handles batch custom shapes, holes, and curved surfaces with high precision and repeatability. For straight cutt ing, a Ø6mm single-flute endmill at 12,000–18,000 RPM with 2,000–3,000 mm/min feed and 1–2mm depth per pass is recommended. For profile milling, a Ø6mm two-flute endmill at 10,000–15,000 RPM with 1,500–2,500 mm/min feed and 0.5–1mm depth per pass works best.
Both methods require mandatory cooling. Polycarbonate melts at approximately 225–250°C, and overheating causes the machined surface to melt and become tacky. Compressed air or fine water mist cooling is recommended — it controls temperature without leaving water stains.
7. Recycling Value of Cut-Off Scrap Material
Cutting operations inevitably generate offcuts, which are not waste but a valuable resource. Clean, uncontaminated polycarbonate offcuts command approximately $600–1,200 USD per ton, with price varying by color grade and cleanliness.
Xinhai operates a PC-R recycling program: customers who purchase Xinhai PC sheets can return cut-off material for reprocessing. Offcuts must be free of film residue and sealing tape adhesive, as contamination reduces the purity and performance of recycled material.